Monday, January 31, 2011

FO - Can-Bottle Cozies

Commissioned work for a co-worker:


As you can tell, these are reversible and will fit most cans and similarly-sized bottles. Not the most exciting thing I've ever knitted, but I'm thinking of knitting some color-coded ones for my kids; they can never remember which water bottle or can is theirs. I probably won't make theirs reversible, though.

Tuesday, January 25, 2011

WIP Progress

I'm up to 5 hexes on the blankie now:

Had to take the picture diagonally and turn it because it was too wide for the camera
Not exactly that one-hex-a-day average I was looking for. I was hoping to work on it more this past weekend but I was busy playing Pathfinder. Oops.

I'm also finishing a scarf WIP for my older daughter, who started one for a friend:
Good thing this is a simple garter stitch project
Despite being fairly inexperienced at knitting, her gauge is fairly consistent though I can tell she did some "distracted" knitting (having done my fair share of it). Understandably, she'd rather focus her efforts on drawing than on knitting; we each have our strengths (drawing is decidedly not mine). This is a very wide, very long scarf she fashioned after the one "Russia" wears in Axis Powers Hetalia. Thus, what you're looking at is the end, not the side. Big scarf. How'd she talk me into this again?

Monday, January 24, 2011

Risky Birdnest

I took a nap this past Sunday afternoon, and when I awoke, I found this scene in our lab:


In the absence of the players, I am left with one question: does the presence of the Gilbird indicate victory or defeat?

Sunday, January 23, 2011

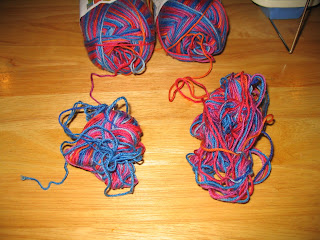
Twin Yarnblobs

Two skeins. Two yarnblobs. 'Nuff said.
Okay, so they're fraternal twins.

Friday, January 21, 2011

Scurvy Yarn Project: Black Cabled Socks

My LYS had a sock yarn sale some time back which I took full advantage of. I purchased, among other things, several shades of tweed sock yarns by Lana Grossa, which I really like. I need black socks, so I decided to start there. I also decided, thanks to some apparent need for punishment, to incorporate some cabling into these socks. Oh, and to make the torment really medieval, I also decided to do them via the two-at-a-time method.

Yeah. Go ahead. Laugh it up.

I didn't take any pics of the first two attempts (both of which I ripped out) because the socks looked too much like a tiny bikini top. This, however, was taken as I was rewinding the yarn after the second or third failed attempt:
At least I found some small amusement; the spool edges stayed put while I was re-winding the cake

It's in a scale because after cutting off the parts that were so bad I couldn't untangle them, I needed to make sure I still had enough for the torture socks.

Here is the yarn after I'd finished, all packed up in Anti-Yarnblob Devices and ready for yet another attempt:
Anti-Yarnblob Devices provide no defense against Scurvy Yarn Projects

Here are the socks, knitted two at a time, with cabling on the tops and cuffs, shortly before I realized the cabling pulled them in so tightly I couldn't get them on:

After I ripped that attempt, I realized two things; (1) I don't have the attention span to do socks two-at-a-time (my mind tends to wander while I'm knitting; that's half the reason I do it); and (2) the gauge difference between regular in-the-round knitting and cabled in-the-round knitting is very, very important.

After that, I decided to just knit them one at a time and only do cabling on the cuffs. So far, I've gotten to the point of starting the cuff on the first sock (I knit mine from the toe up), but now I've got to rip out the two rows of cabling and the increase row because I added too many stitches:

Eventually I will get this right and finish these darned socks. No pun intended.

Thursday, January 20, 2011

WIP Progress: Hex Blankie

So far, I've gotten two hexes done on the blankie:
Right-side view

Wrong-side View; cast-on or mitosis? You decide.

It took me a day to finish the first one (including several froggings and re-dos) and an evening to do the second. At that rate, it'll take two months to finish. Well, I spose it's better than ten years.

Wednesday, January 19, 2011

New WIP: Hex Blankie and a Once-in-a-Lifetime Joke

I bought an afghan pattern some time ago for my Hubby called Komb, published by Berroco. It's a no-sew job and the motif is a hexagonal shape, which is great for an RPG GM like my hubby:
I wonder if Berroco knows that hexagons are used for outdoors mapping in RPGs

Now that I've finally finished the green blanket I felt no guilt in casting on for this one, which will be considerably smaller than the green one:
This nifty hexagon has a dirty little secret!

Once I started really working on it, however, I realized it wasn't entirely a no-sew job; the pattern calls for you work the motif back and forth and then sew the seam. This has two unfortunate side effects: 1. you have to sew; and 2. for all that trouble, it leaves a very visible seam:
The seam, approx. half a cm thick, is even visible in this flat photo

Heck with that; I decided I'd just knit it in the round. It required some pattern adjusting, but not a lot, and yielded the same tidy hex and no seam:
Knitted in the round
Look Ma, no seam!

So what's the once-in-a-lifetime joke, you ask? Well, being who I am, I had to fling the completed motif shuriken-style at the nearest family member and shout "I put a hex on you!"

The eye-rolling was exquisite.  Boo-yah.

Tuesday, January 18, 2011

Ruby vs. the Hairdryer

Recently, my teenage daughters talked me out of my hair dryer. I was using it to dry paint on minis; they wanted to use it for *tsk* hair. Bah!

Anyway, the one I let them talk me out of was full-sized and had multiple heat and blast settings. While great for human hair, even the low settings would blow a plastic (e.g. Warhammer 40K) mini right off the counter. I couldn't tell you how many times the Termagants went flying despite a lack of wings.

Having recently started painting again I realized I really did need another dryer; flying minis aside, having the girls tote it up and down the stairs was both time-consuming and problematic. So, off I went this past Saturday to Sally's on a quest for a smaller dryer, perhaps small enough not to blow my Warhammer 40K Chaos Space Marines off the counter once I start on them. Granted, they have jet packs, but that's still no way to go.

Fortunately, Sally's had just the thing, pictured here with a Reaper mini I painted for our current campaign ("Ruby") and a pencil for scale:

Being somewhat of a nerd, I was skimming through the little information booklet that came with the hair dryer (in case there was anything useful in it; scuze me while I look for my pocket protector) and found this little page of helpful styling hints:

I will admit that occasionally, when blow-drying a mini, I am amused at the thought of drying their hair, which inevitably fails to waft in the breeze, even with a styling tool:
My youngest casts "Summon Styling Tool IV"

Ruby does not appear to be quite as amused, however:
"I'll never tell you where I hid the gems!"

Ruby, however, is metal and thus not likely to go scooting across the counter with anything less than a shop-vac set to blow. Instead, I tested the power settings of this little dryer against one of the plastic WH40k Chaos Space Marines. He bravely stood his ground on the low setting; the high setting made him do a bit of a moon walk, but at least he didn't go flying off the counter:
"Wow, can you outfit that with a laser sight?"

Monday, January 17, 2011

RPG Mini WIP - Male Ninja

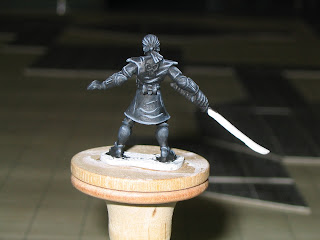
I posted recently that I'd chosen #03081 Edo (Male Human Ninja) from Reaper Minis for my January mini. I chose him in particular because he's not complicated color-wise and also because I already have Mad Painter Notes from my Guild Assassin to use for the color scheme (since they're in the same Guild). Believe it or not, I actually started on him and thus far have done the basecoat, highlight, wash and a second highlight:

Ignore the dungeon in the background: our boy here is not quite ready


I'm not completely satisfied with the highlighting. Unfortunately, I'm not exactly sure exactly how to fix it to my liking, so I've posted him to the Reaper WIP forum in the hopes of getting helpful hints. Naturally, any of you fine folks reading this who have hints can feel free to post them here if you don't have a log-in on Reaper.

p.s. the dungeon tiles in the background were made by my Hubby

Saturday, January 15, 2011

Knitting in Pathfinder 2: Famous Hubby

I posted a while back about my Hubby entering a yearly writing contest held by Paizo. Just a couple of days ago, his first round entry was published in Kobold Quarterly, an RPG magazine. Naturally, I'm very proud of him. It was many years since he was last published in an RPG magazine, and now he's done it again and is working on other articles, and I think that's very cool.

What's even cooler is that his first round entry was about magic knitting needles.
Boo-yah!

Friday, January 14, 2011

FO: The Green Blanket

At long last, I finished the green blanket yesterday (also my birthday). After teaching myself to knit 10 years ago, I bought a small book and the first skeins of yarn for this and several other blankets (the others were for my kids and were completed long ago). This blanket, however, isn't just a blanket: it's a story of 10 years of my life and the progression of my knitting skills and knowledge.

When I first bought the yarn for this blanket, I felt guilty for spending the money, even though RedHeart has always been fairly inexpensive. I originally bought six skeins for my green blanket; two shades of green and one shade of tan; my thinking was that each skein would make a stripe. I was going through a divorce when I cast on for it. Somehow I always felt comforted when I worked on it, no matter how difficult things were. It's been in actual use ever since I got enough of it put together to lay across my lap for a cat to lay on:
This was taken in July of 2008, when there were still only three colors

I also learned a lot about knitting during this project. For instance, when I sewed the first few pieces together, I had no idea how much they would draw up; the piece was much shorter than I expected, so I had to add rows. At the time, I had no idea that you could unbind the bound-off stitches. Thanks to knitting button bands for sweaters, however, I had learned to pick up and knit, so that's what I did. You can just see the odd-shaped stripe in the middle sections:
Here we see the importance of learning to un-do…

When I finally got the stripes long enough, I realized the six stripes I would be able to make from my original six skeins would not be wide enough, so I added more green and a green-brown multi to lighten things up a bit. While I was knitting with the multi, I learned that multi-colored yarns are not as thick as solid-colored yarns. I still needed to add some width to the blanket, but I didn't want to use more of the multi-color, nor more of the tan since it looked kind of drab, so I decided to go with more green and a darker brown:
Here we learn the importance of dye lots…
This was taken in December of 2010; blanket is bigger and with more colors, but still holds cats just fine

By the time I bought the last batch of yarn for this thing, I was married to my darling Hubby, who scoffed at the notion that knitting was a selfish or wasteful hobby, bought me yarn instead of flowers after an argument, a knitting machine (Vera) so I could churn out big stuff quickly, and who has accompanied me many times to our LYS to watch me ooh and ahh over the yarns. So now, 10 years after starting this blanket (5 of which we have been together), he and I get to share it for many years to come:

Boo-yah; we win.

Thursday, January 13, 2011

Posable Figure Body Bag

While repairing my older daughter's posable art figure, I came to the realization that she had no portable container for him or his magnetic stand, so I grabbed some yarn from the Yarn Booty and cranked one out:
Looks like a wine bottle
Or maybe a sleeping bag
Also usable as a beanbag chair
Pencil and grid for scale (ignore the dungeon in the background)
Mad Knittist Notes
Not too shabby for a no-pattern dice bag variant :-)

Wednesday, January 12, 2011

Posable Figure Repair: When Yarn, Hardware and Art Coalesce

While we were snow-watching this past Sunday, my older daughter told me that "Jesse," a posable art figure, might be done for. Apparently, his foot had come off several times, though until today, she had been able to repair him. For some reason, she just couldn't get him fixed this time, despite attempting to use yarn to pull him together. After she described the issue, I talked her into bringing him down so I could take a look:

Jesse, all in pieces

Turns out a couple of the screws were stripped. My MacGuyver Mom skills still reasonably sharp, I realized we would need both yarn and wood glue. I applied the wood glue to the screws while he was still in pieces so it wouldn't affect his ability to move:

This springy screw has to be pulled through leg pieces and onto the hip screw.

The hip screw: not easily reached.

Once the wood was dry, I cut a piece from my trusty ball of beige crochet thread, hooked it onto the spring attached to his foot, strung it through his leg pieces and pulled it onto the screw in his hip, all of which sounds painful enough to make me grateful I'm not a posable art figure:

Aunt Lydia's to the rescue

Pulling the yarn through the hip joint and up onto the hip screw; note the loose shoulder screw, lower left of photo

Noticing his shoulder screw was a little loose, I went ahead and dabbed a little wood glue on that and the remaining screws:

Wood glue drying

Here's our little superstar, all fixed up and ready to work:

Supah-Stah!

Tuesday, January 11, 2011

Sometimes Yarn Just Won't Do

My Hubby was recently working on some dungeon bits for our Pathfinder games and asked me to create some tiny bedclothes for the beds he'd made. I decided to use crochet thread and a tiny hook (1.65mm) and crochet them. Even so, it was really difficult to get them small enough. The pencil and 1"x1" background grid are for scale:

The evolution, left to right; final version far right.

I finally got it the right size, and even managed to make the sides turn down a bit so they'd hang off the edge of the tiny beds:

Final version, side view.
Vinal version, end view showing turned-down sides.

I even made some Mad Knittist notes as I went along so I could re-create the bedspread since my Hubby would need a dungeon-full of them:

Unfortunately, the very nature of yarn ensured that the tiny bedspread curled a bit, and at that scale, its own weight was not enough to pull it down. We suspected that even with gluing, it would still curl. Also, the depth of the crochet stitches made the bed nearly 1/8" wider than without the bedspread. Using the same 28mm scale as the character minis, that's roughly the width of a shoe. No yarncrafter in their right mind would make a bedspread that thick. Sorry, Aunt Lydia, but yarn just wasn't gonna do.

My Hubby, however, was undaunted. He decided to use paper, some origami-esque folding tactics and some shaved foamcore, and I think they turned out great:


The paper makes it look like they were patchwork-quilted, perhaps by the innkeeper's wife. My Hubby's full blog post on the beds and other dungeon bits can be found here.